Hello everyone!
I have decided to participate in the second contest of articles. During the first contest people expressed their gratitude for the material, and I was touched. Now I would like to share more writing with you.
This time we will discuss the automated transfer of costs from a traffic source to a tracker. In this I will share my personal experience. Then we’ll see how you can quickly start working with API in the Binom tracker and various traffic sources even if you are not a software expert. Next, I will show you how to work with the Postman service and to smoothly translate requests into any of the popular software languages known to you.
And even if you don’t know any of those languages, you can use ZennoPoster to generate the necessary requests. The rest of the scheme will be built up of logic blocks in the flowcharts. Or you can compose a detailed request for a freelance programmer, this is also a viable option.
Let’s start with the theory.
Why would an affiliate want to transfer costs from a traffic source to a tracker? Simple, to have everything in one place — in the tracker. So that you can see the real metrics of your campaigns: both the total turnover and the costs of keeping the campaigns running.
This allows you to assess your campaigns from different perspectives, it is not always possible with just the traffic source data.
For example, if your tracker can determine the percentage of bots that came from each traffic source (the Binom tracker has such a feature), then you can calculate the cost of each real click leading to your landing page. It is usually impossible to see such information directly in a traffic source.
If you work with pay-per-click ad networks, it’s very easy to forward cost data. You just need to specify the cost of one click in the tracker settings.
But what if you pay for each display of your creatives on ad network websites? With a large volume of traffic, these impressions can grow in number very quickly, however you may get fewer clicks than you expected. And while you spend time thinking that scarce clicks mean that the source has little traffic, the number of impressions will grow rapidly making every click cost you an arm and a leg.
Moreover, if you open the campaign statistics in the traffic source, you will see the total costs and be able to split the costs by creatives, by sources, or by any other criterion. But in a tracker, you have your own metrics with detailed turnover for each source. Thus you can discover which of the traffic sources is in the negative, and which gives you more than 200% ROI. So, you need to combine the two statistics, compare the data and only then you can draw conclusions.
It is a tedious task if you do it manually, because you need to update the costs for each source in each campaign.
If you only have a couple of campaigns, you can afford to spend half an hour each day updating the sources one by one trying to avoid any mistakes. But what if you have dozens or even hundreds of campaigns? What if you want to update the costs more often than once a day? Do you need an army of slaves?
No, you will be really efficient and automate the whole process. Note, this will not even be your competitive advantage. On the contrary — if you do not automate you will be lagging behind your competitors.
Some time ago, I discovered specific features of this process while writing my data throughput script to transfer the cost statistics to the tracker. Some of them may not be obvious. I am willing to share the knowledge.
1. Choosing the parameter for cost updates.
You can only update the cost data in the tracker by one parameter. Each click you get from an ad network has its own unique cost, which depends on many parameters: the cost of impressions on the source website, the user’s device, CTR of the creative, etc. Traffic sources do not disclose such data (and we do not need it), but they provide average data on various parameters. You can choose any parameter, but I recommend one of the two most useful — the creative ID or the ad platform ID.
2. The load on the tracker database.
Databases do not favor tedious reports, because they require a multitude of small operations. This can be compared to the performance of a computer’s HDD — it takes longer to record a thousand small files than one large file of the same size.
As the load grows, the performance of a database decreases. Therefore, it is important to choose the correct time for your cost update. It is wise to do this when the volume of incoming traffic to the tracker drops, for example, early in the morning. Choose the time by the time zone of your target GEO, not your own. Also don’t forget about the difference in time zones.
3. Time zone.
In addition to the time zones of your GEOs, don’t forget about the time zone of the advertising network where you buy traffic. Usually it is the UTC, but there may be exceptions. Plus, there may be a difference with the time zone of your tracker.
For example, if you set the UTC+3 time zone in the tracker, you should take it into account when updating the statistics. When a new day starts in the tracker, the traffic source operating in the UTC time zone will still have three hours until midnight.
If you want to update the costs for the previous day at exactly 12:10 AM, the result will not be true as the data from the network will lack metrics for 2 hours 50 minutes.
4. Inaccuracy.
No matter how often you update the costs in your campaigns and how neatly you do it — there will always be a small inaccuracy in the results. And the more rows you update (for example, the number of sources), the larger the inaccuracy. This is ok, you can work with such data, but you should track the percentage of inaccuracies so that it is not very high.
Here is a pattern to motivate you — the higher the total expenditure, the lower the inaccuracy. So, drive a lot of traffic.
5. The cost updates for your campaigns.
To avoid loading the tracker database in vain, you need to check parameters of your campaigns before starting the update. You don’t want to update costs in a campaign that hasn’t been active for a week, do you?
It seems transparent, but the script doesn’t know it until you write it down. If you don’t, at best you will get a script error if the traffic source returns an empty request. At worst, you will load the database for nothing.
You should also check campaigns for the minimum costs or number of clicks. There were moments when a freshly launched campaign was running without any traffic, spending less than a dollar per day. And, of course, my script updated it along with other campaigns.
Do you need an update if there is nothing to update? Of course, not. It’s just an extra load on the database. This issue is solved by an additional check for the minimum amount of expenses. This check deals with the issue of excessive load on the database.
6. Checking the correctness of the update.
To be sure that the cost update works correctly, we need to take the updated costs in the tracker and compare them to the actual costs in the source. Thus we will get the value of inaccuracy described in the 4th section. You can also add the previous cost value from the tracker to the comparison.
For example: before the update you had $10 spent in the tracker, after the update: $18.4. Actual costs in the traffic source: $18.2. Inaccuracy: $0.2
It is better to run this comparison with each update. The resulting report may be sent to Telegram, Slack, e-mail, etc.
7. Updating the cost per click.
To mitigate the difference between the data in your tracker and actual costs in the traffic source within a day, it is convenient to re-calculate and update the average cost per click for the campaign every time you update the costs.
In this case, the total expenditure per day in the tracker is very close to the actual amount. And when the cost is updated, this amount is just redistributed between different sources (or any other chosen parameter). The Binom tracker has the necessary features. And it’s very convenient.
8. Scheduling the updates.
There are three main methods for setting a schedule for script launch.
The first is via the cron service directly on the tracker server. It is a reliable option, but you need to configure everything on the server manually.
The second way — using aws lambda functions. My first contest article was on this very topic. This option is rather convenient and free of charge. I chose this one for myself.
And the third option is to set up a schedule in ZennoPoster. The downside is that it is not very convenient to keep a PC turned on at all times for the sake of this schedule, and allocating a separate computer for ZennoPoster is unprofitable.
That was all about theory, let’s move on to practice.
We will discuss how to work with an API using the Postman software.
First we need to download the software from the https://www.postman.com/ website and install it. I will not go through these two steps here. During the installation you will also be asked to register.
The basic features of the program are free of charge, advanced toolkit can be found in a paid premium account. But for our purposes payment is not needed, the basic version will be sufficient.
So, the software is downloaded, installed, and launched. Now we can deal with the API. Let’s start with the API in the Binom tracker.
For example, let’s take their test tracker at https://demo.binom.org/. Links to the API can be found in the corresponding section in the settings https://demo.binom.org/?page=settings#tab=api.

The API key is also there. We will need it, too.
Open both versions of the API each in a new tab.
Let’s start with the second one. Open the page:
https://documenter.getpostman.com/view/4002000/RVu7Dnr4?version=latest
What do you see?
The familiar Postman logo and the “Run in Postman” button in the upper-right corner. Hit it.
The browser prompts us to open the Postman software.

We open it and see that a block has appeared on the left:

This block is called a collection in Postman. A collection contains various API requests that the tracker can understand.
Click on the arrow on the left, and you will see many sub-sections divided into functional blocks.
For example, open the “Monitor block” and see a single GET request monitor@get. As you can guess from the name, it is responsible for the data on the monitor page in the tracker. It provides information on the current user, server parameters, the server load, etc. Click on it and it will open in the central panel.
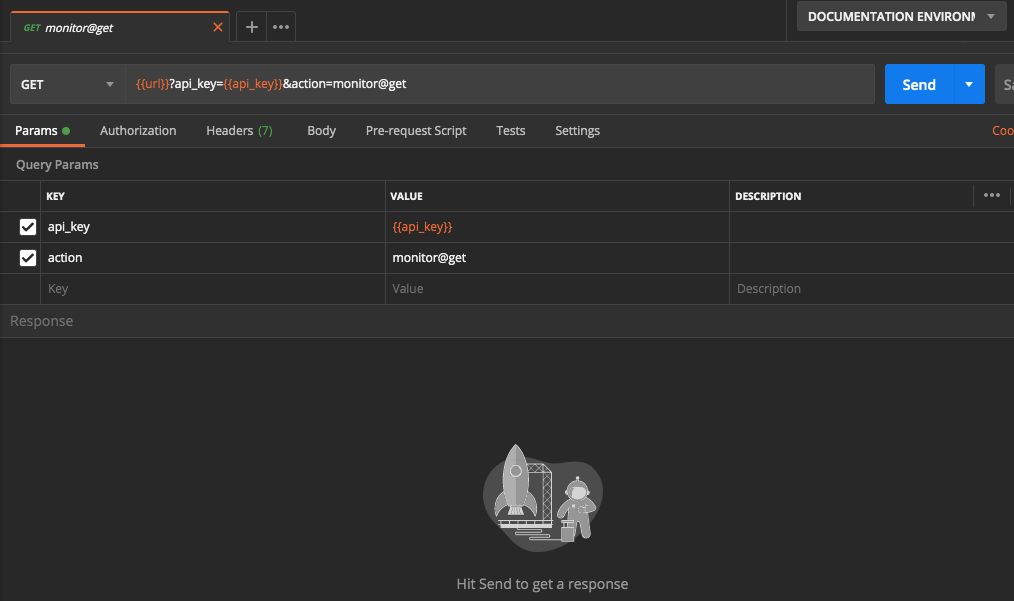
Now let’s launch it. But first, we need to enter the domain of our tracker and its API key. In their places, we see strange entities {{url}} and {{api_key}}.
These are variables used to make our life easier. Instead of entering our domain and API key for each request, we have to just submit them once — in a variable environment.
The environment can be configured in the upper-right corner. We can even have multiple environments, each with separate variables with different domains and API keys. And you can switch between environments in a couple of clicks.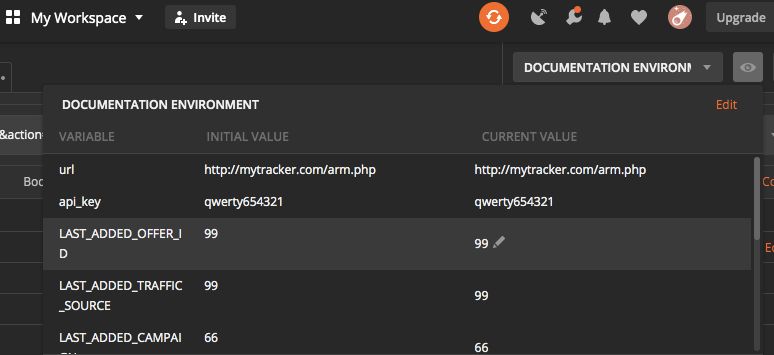
Let’s finally enter the domain and the key. To do this, click on the button with an eye, then on the word “Edit” — a new window with all the environment variables will open.
Now we are only interested in the first two columns. Change the values in the “Current Value” column to the values from the Binom test tracker.
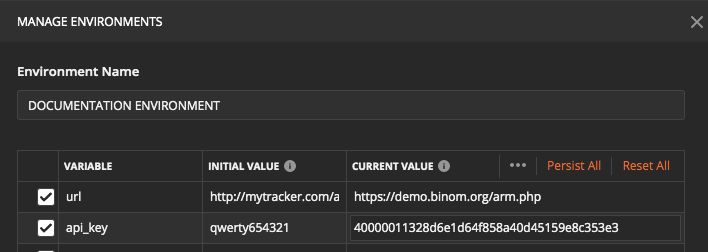
Click the orange “Update” button at the bottom, close the window, and finally send the request to Binom by clicking the blue “Send” button.
Wow. The server has sent us a response:

If you compare this data with that on the tracker’s monitor page, you can notice the correspondence. The difference is: in Postman the data is encoded in a special format (JSON) for data exchange between programs.
All other requests from the collection will work the same way. Everything is possible: you can get, create, edit and delete the data. You just need to find the right way to do that and enter the required values.
Now let’s look at the Binom v1 API on the page https://docs.binom.org/api.php#p3
Unfortunately, there is no “Run in Postman” button here, and you will have to figure it out manually.

Right away we see the link “Update costs”, that is what we need. Click on it.
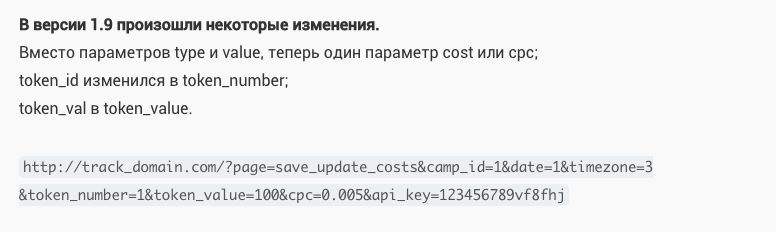
Here we see a link where you can insert the data to update the costs of the desired campaign for any period. We have the tracker version 1.14, so we are interested in the link for the versions starting from 1.9.
(
Changes have been introduced to the version 1.9
Instead of “type” and “value” parameters we now have only one: either “cost” or “cpc”;
“token_id” has been changed into “token_number”;
“token_val” is now “token_value”
)
Copy it and transfer it to the Postman.
The program recognized it and filled out the necessary fields as variables.
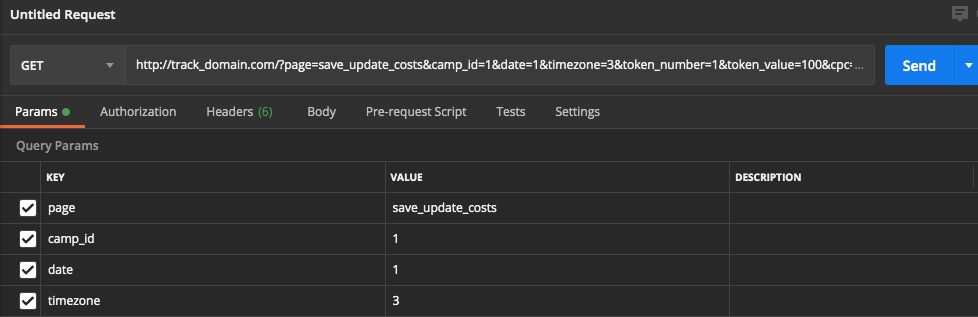
Since we already have the domain name and the API key in variables, we transfer them here.
But since the {{url}} variable stores the address with a link to the “arm.php” file, and we only need the tracker domain, this variable is not suitable for us.
You need to either create an additional variable with the tracker domain, or register the domain directly in the request. For now, let’s focus on the second option. And we will substitute the api_key variable.
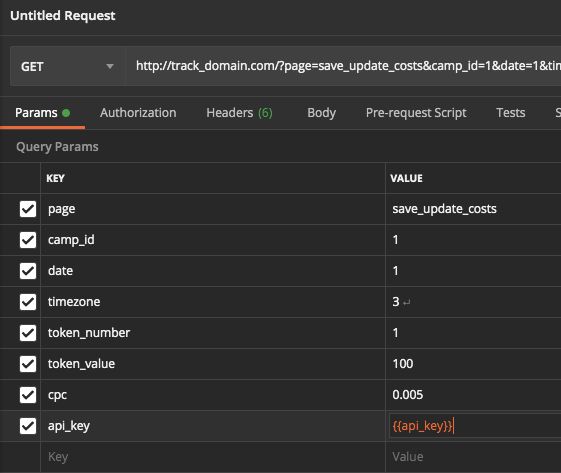
Now all you have to do is set your campaign parameters according to the description of each parameter and click “Send”. The costs in the campaign will be updated.
We will get a response from the tracker even if we just send this test request:

It tells us that no such token was found in the campaign with id #1, and therefore there were no clicks to update. But it works with actual data, I guarantee.
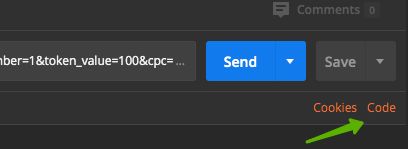
There is still one more point: how do we translate these requests into a software language script? Of course, you can transfer everything manually. But why waste your time if Postman has a cool feature that automates this process as well. Just click the “Code” link under the “Send” button.
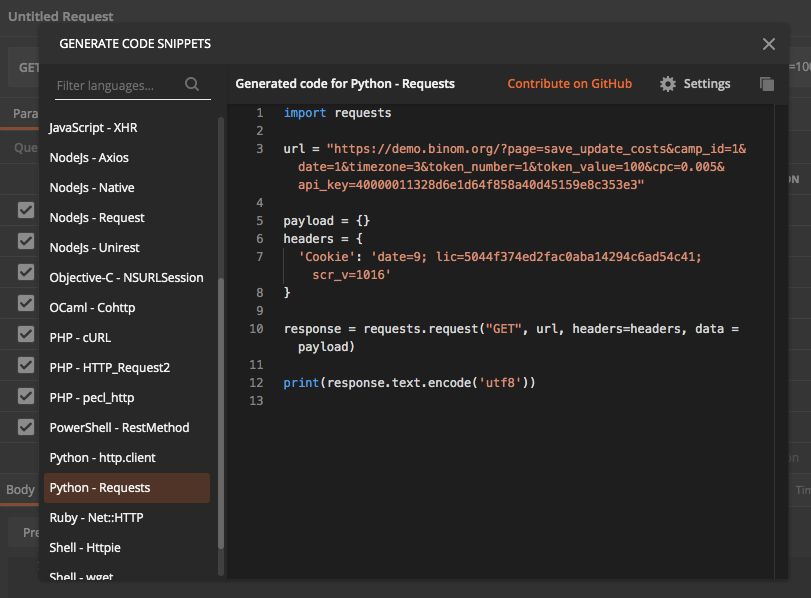
And now we see a window where the selected request has already been translated into dozens of software languages.
It can cater any taste: PHP, Go, Python, C# or Nodejs. It’s your choice.
The same scheme works with the majority of traffic sources.
Take PropellerAds, for example. A quick Google search for “Propellerads API” yields a link to their API documentation: https://ssp-api.propellerads.com/v5/docs/ The API key can be obtained in the advertiser’s member area.
From there all the steps are the same. Transfer the requests to Postman, test them manually, make sure that everything works, then translate the requests into the software code.
Then you will only need to elaborate the logic that will govern the data reception from traffic sources and fill out the cost update requests to the tracker.
Programming is a flexible tool, you can tune it to your needs. And you already know a lot more about the tricks and hidden traps of this process.
Good luck!